January 30, 2019

Textured Heart Banner


Happy Thursday friends! Can you believe today is the last day of January? To me, it is the shortest and longest month of the year.  Has the polar vortex affected you where you are at? We are in Florida and it actually got to 25 this morning! I personally love the cold weather, but most people around me do not. Haha!

Today I have something sweet to warm your heart. I have teamed up with a few great home decor bloggers to share some simple, but beautiful Valentine's Day projects. They are all fairly simple, but will add such a sweet little touch of love to your home.


I knew I wanted something simple, neutral, and fresh for my DIY. I got the idea to create heart shaped salt dough ornaments to create a banner with. This is very easy to do and you can even have your kids help!

To get started, you will only need salt, flour, water, and heart cookie cutters. If you prefer your ornaments to be whiter than the natural color of salt dough, you can add a bit of white acrylic paint.

The recipe I used to create the dough:
1 cup flour
1/2 cup salt
1/2 cup warm water
2 oz white acrylic paint

I first dissolved the salt into the water and then mixed in the flour and paint. After it was thoroughly blended, I kneaded it and formed it into two large balls. I rolled them out like cookie dough and cut out the heart shapes. I used a toothpick to create two large holes in the tops of the hearts. This is where I will string the ribbon for the banner.


Now here is where I meet a fork in the road. I did two types of hearts. The directions for each will be below the pictures of each type.

French Scripted Hearts

For these fun hearts, I simply used a large french script stamp on the dough immediately after I cut them out. Be sure to dust your stamp with flour before you press it into the dough. It can be tough to dig all of that dough out of your stamps. (Ask me how I know.) I did some with a suede colored ink and I did some with no ink at all. I like how both turned out! I allowed these to dry out at room temperature. It took 3 to 4 days for them to be completely dry.
Once they dried out, I used some vintage buttons to add a little visual interest. I simply used super glue to attach them.


Rosemary Hearts

These were much more simple. After cutting out the hearts and adding the holes, I pressed a small sprig of rosemary into the heart. I did use a drop of water on the dough to heart it stick. I baked these for about 2 to 3 hours at 200 degrees in the oven. Be sure to check them every hour or so to make sure they do not over bake. Of course the thicker they are, the longer they will take.


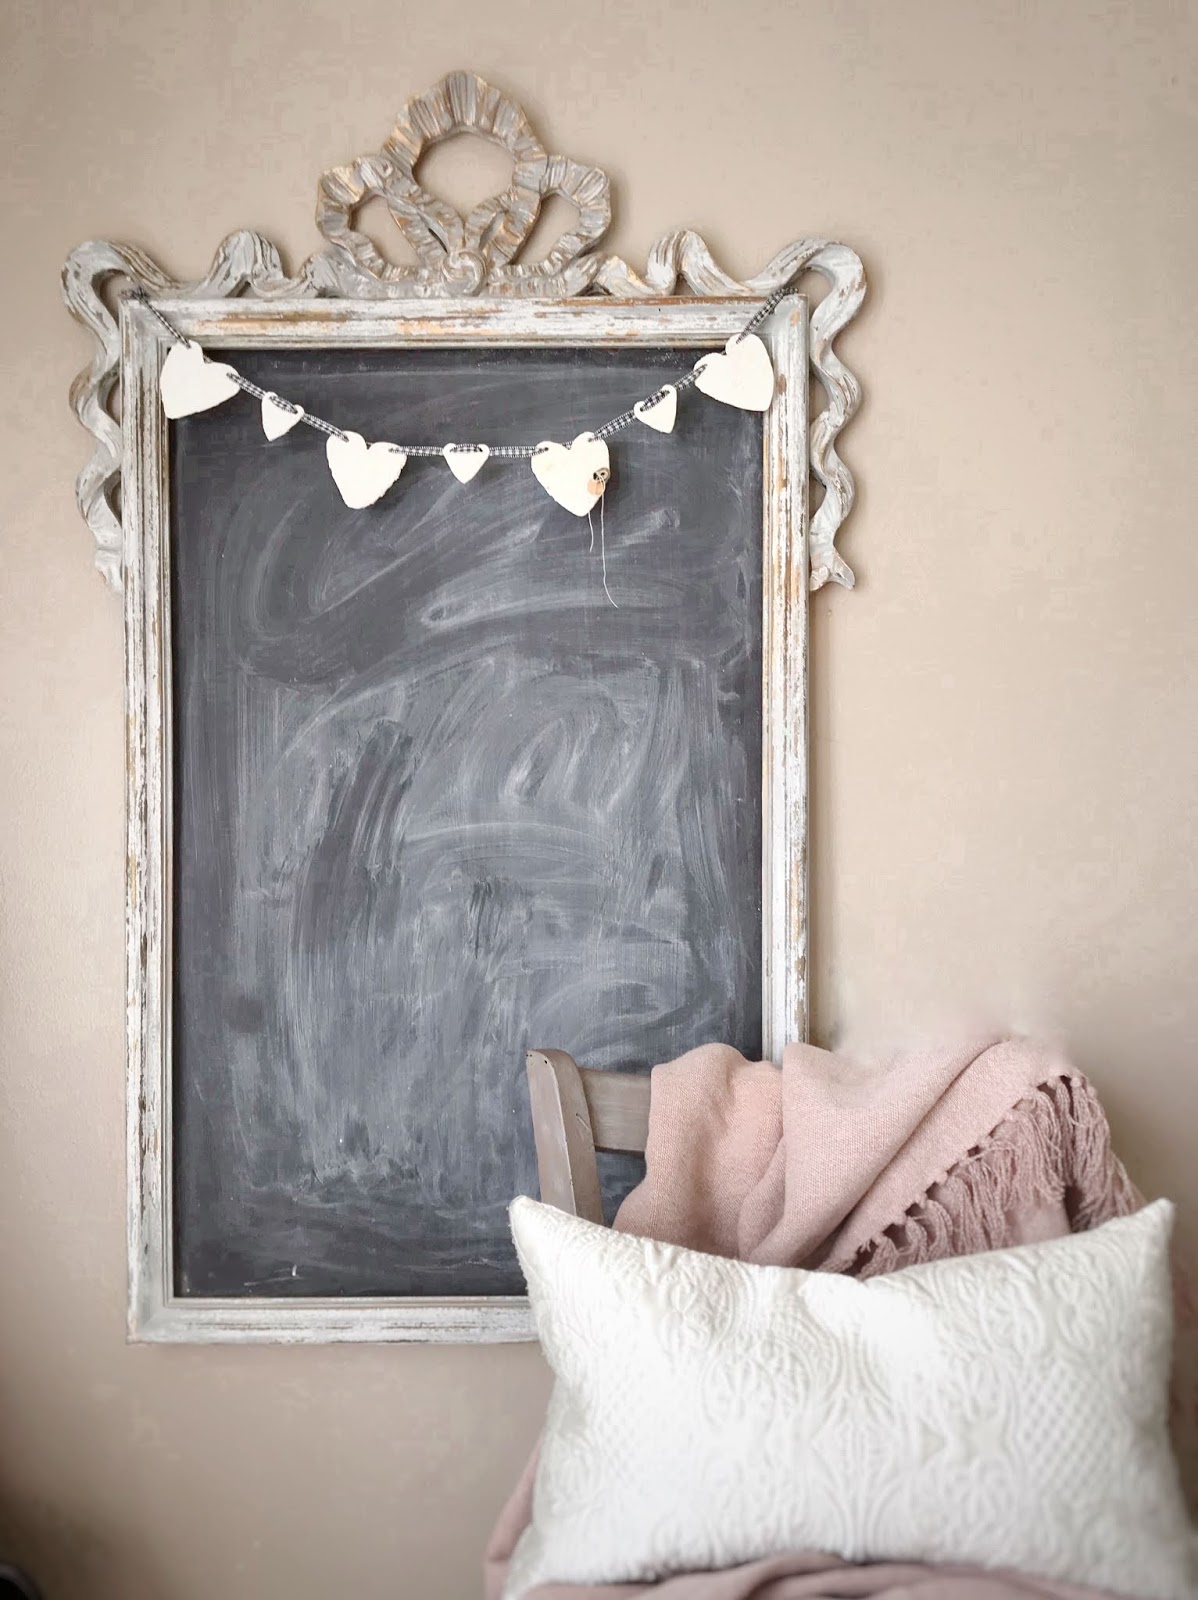
After the hearts were all dry, I used a tapestry needle to thread a 3/8" wide ribbon through them. This helped the edge of the ribbon not to fray as I repeatedly threaded it in and out of the hearts.


Once they are were all strung together, I used command strips and hooks to attach them to the chalkboard in our eat in kitchen. These would be perfect anywhere in your home. They are pretty and the refreshing smell of rosemary is just the thing to lift your winter weary spirits. 


Romantic Book Stack

Victoria is one of my great new friends from the amazing home decor community over on Instagram. She has such a beautiful, classic style that just draws you in. I am in love with this beautiful stack of personalized books she made for Valentine's Day. 


Heart Garland

Cate over at West Magnolia Charm has created a one of kind banner for the day of love. It reminds me of all the crocheting I used to do with my grandma and cousins. It also looks super cozy during this crazy winter weather.


Valentine Map DIY 


My travel-loving heart is obsessed with the Valentine Map Dani has created at The Taborhood!!!


Simple Rustic Valentine's Wreath

Kayleigh has put together a lovely rustic wreath to share with us at The Rusty Barn Blog.


What I Learned in 2018 | Strength

Wow, you guys. I have not touched this blog in over three years. It seems so strange that this little piece of my heart has just been floating around on the internet untouched for so long. So much has transpired during that time and I have learned a lot about myself. One thing I've learned is how my heart longs to be creative. And I love having this outlet to share with you.

This post won't have a lot to do with home decor or DIY, but come back tomorrow for a fun Valentine's Day project!

Today I just want to get my feet wet in the blogging world again.... you know, see if I still know how to do this thing.

In  2018 I turned 40. That is a big milestone - one I was actually excited to reach. I feel like a bonafide adult now. It was a year of self reflection and I feel I learned a lot about myself. Because of that journey, my list will mostly be things I learned about myself. Maybe you can relate?


 I am strong.
Yes, this is a bold statement. It's one I have mulled around in my head for quite some time, but have never said outloud. I don't know if it's women in general or just my personality type, but I have had a hard time admitting that I am strong. In 2017,  I started really building my physical strength and that has been an incredible journey. But I was strong long before I had muscles. I think if we all take a look deep inside ourselves and reflect on our lives, we will realize what has been dealt our way takes an incredible amount of strength to deal with. For me, sometimes being a homeschooling mom takes all of my strength. Holding up our home and taking care of our family while my husband is literally across the world requires strength for sure. Moving every one to three years is not for the weak. And losing my dad quickly to cancer while my husband was in Afghanistan and I had a one year old at home definitely took every iota of strength in me. I know there are many people out there who face much more difficult things every single day of there lives. But I think it is important for all of to stop an recognize that we have a mountain of strength inside us.


*When I started this post, I had intended for it to be a list: one post and done. But I got to writing about the first thing on my list and discovered I have a lot to say. So, I decided to make this a series of posts.


April 8, 2015

One Room Challenge | Week Two

Our entire home is painted the same neutral color.... although I don't think it is truly, truly neutral. I kept saying to myself and others the paint was too much of a yellow base and I wanted a cooler tone. But when I really got to looking at it, I realized it has a green base. Not pretty and definitely not neutral. I've been leading a campaign in my home to update our paint color for a few months now. Unfortunately, the mayor of my town wasn't having it. I finally convinced him to let me try out paint on our master bath. I am convinced when he sees how amazing it looks, he will let me do the rest of the house.

Thankfully, the mayor happens to be away on business at this time and I have been free to paint the bathroom my own way and deal with the mishaps on my own terms. I'm mostly thankful because the first color I chose {and painted half of my bathroom in!!} was a total disaster. I don't why I kept thinking I wanted white. But I did. So, I bought it. And, well, here it is....


I thought I wanted white. When I got it up on the walls, I hated it. It just looked so stark against the creamy floorboards and the warm tile & marble. 

This is the part where I had to really evaluate the look I was going for. Why did I want white walls? How could I achieve what I really wanted? 

I knew I wanted a gray. As you can see, the tile and marble in my bathroom are very warm colors. So, I hopped on Pinterest and searched for warm grays. I analyzed grays all night and all morning. Then, I headed back to Lowes for more samples. When I got home, I painted several different colors on different parts in our bathroom where the light hits it differently.


Once I the samples on the walls, it was an easy decision. I kicked myself repeatedly for not doing this the first time! I went with Homestead Parlor Resort Taupe. It is a fantastic color from Valspar. It looks warm and cream colored in certain lights and then a great gray in others. 

I could not love it more.

I apologize for the quality of the photos. I snapped them quickly with my phone as my family and I were running out of town. {notice the suitcase} 


It is amazing what a difference half a gallon of paint can make!! Once the paint was done, I was beginning to see my vision for this room come together and I am so excited! Next up I will be working on some new accessories, shelving and light fixtures. I hope you join me in the journey! 

April 5, 2015

One Room Challenge | Week One

Just last week I was scrolling through Instagram and was introduced to the One Room Challenge. I was intrigued, so I hopped over to Linda's blog to find out more. The One Room Challenge is a concept created and run by Linda of Calling it Home. Linda hosts the challenge twice a year in April and October. This amazing idea is actually in it's eighth season. I don't know how I have missed out on it thus far! In a nutshell, a designer will work on updating or even renovating only one room for six weeks. Each week, progress is shared on the designer's blog. You can read all the juicy details on Linda's gorgeous blog.

I am so excited to participate for my first time this spring. So, let me introduce you to the room I will be working on for my first round: our master bathroom.


{BONUS: a selfie shot!}


Our home is only two years old. We are the first owners, though we did not have it built. We won't live in it forever. It will likely only be a total of four years or less. I'm telling you this because I feel kind of silly updating anything in our home. I mean, it's practically brand new! But here's what you also need to hear: It is important to make your home your own. No matter how new it is. No matter how long you will live there. Home is the heart of our families and our lives. Make it your haven.

Now, on to the plan!!!


1. First things first. I plan to start with the easiest, most inexpensive fix there is out there: PAINT. I'd really like to do a warm gray of some sort, but not entirely sure on the shade yet.

2. Next up, I'm looking to replace our light fixtures. Again, they are new and they are very nice. But they just aren't our style. I would really love to have some sort of industrial farmhouse fixtures over the vanity. Also, in my dream design, I'd LOVE a chandelier over our soaking tub.

3. Because of all the wall space in this room, I think the addition of floating shelves would be great. Luckily, my hunky hubby is a fantastic wood worker and he is happy to help me with this. I plan to stain them in a dark, rich hue. I love the mix of natural elements and industrial pieces. {source}

4. Finally, accessories!! This is my favorite part of any room. I want to find some luxe rugs to add warmth and depth to the marble tile. I'd also love to add some greenery and maybe an antique mirror or two.

So, that's it! I hope you join me on this exciting journey. I'm already looking forward to using our new and improved space!!